We will tell you about how to whiten teeth in Photoshop and the tips that aid us in this activity. This can be done via the help of a tablet, a laptop, or even a mobile phone.
This post will teach you how to whiten teeth in photoshop. You can use the same technique on photos taken with a camera or a selfie. This technique works best on untouched images or those that have very little feature.
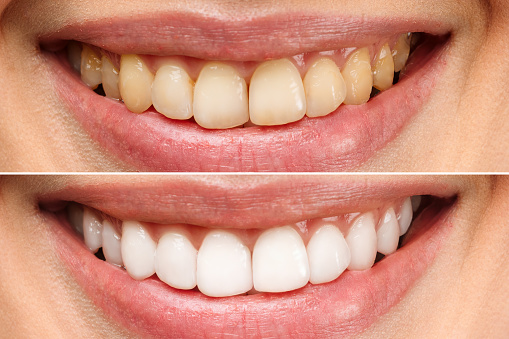
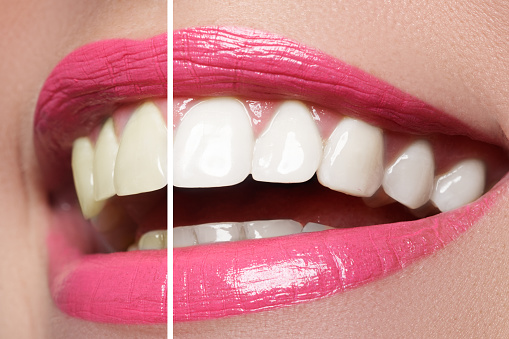
Teeth are a key focal point in many photos so naturally, we want them to be nice and white! This tutorial will show you how to whiten teeth in photoshop, a very simple and easy tutorial.
If you want to whiten teeth in Photoshop, you need to first understand the process of whitening.
https://www.adobe.com/in/creativecloud/photography/discover/how-to-whiten-teeth.html
What is whitening? Whitening is a process in which the color of an object is changed to a lighter shade of its original color.
To whiten teeth in Photoshop, you need to make two adjustments: one to adjust the overall brightness and one to change the hue of the teeth. You will be making these changes in two different layers so that you can see how each adjustment affects your photo.
If you’re looking to whiten your teeth in Photoshop, there are a few things you need to know.
The first thing is that there is no way to whiten teeth in Photoshop. Photoshop doesn’t have a magic wand that can instantly make your teeth brighter. You have to do it yourself by using the tools in your toolbox and some simple techniques. So before we get started, here are some tips for how to whiten teeth in Photoshop:
1) Take good pictures of your teeth. The best way to whiten teeth in Photoshop is by taking good pictures of them! If you start with bad lighting or poor-quality images, then you’ll never be able to get good results from any kind of editing process. Try taking pictures outside or in bright lighting so that there’s plenty of contrast between the white parts of your tooth (where the light hits) and the darker parts (where it doesn’t).
2) Then, use one of these methods:
-Invert the image and then adjust levels until it looks right (see below). This will make everything black except for where there is light on your teeth—it will leave dark shadows where there was shadow before but also lighten up dark areas.
I’ve seen a lot of tutorials on how to whiten teeth in Photoshop, but they all require advanced skills in the program like layer masking, or they just involve too much work to be efficient. This article gives a quick and simple approach to showing you how to whiten teeth without having to use or create additional layers.
Open an image in Photoshop that has teeth that you want to whiten. Duplicate the background layer by dragging and dropping it on the “New Layer” icon in the Layers panel. Apply a Gaussian blur filter to the duplicate layer to smooth out any imperfections in the teeth and make them easier to select. Switch to the Brush tool and choose a soft-edged brush, set the foreground color to white, and paint over all of the teeth on the duplicate layer, being careful not to paint outside of their edges. Create a new Hue/Saturation adjustment layer, and then use the slider in this dialog box to lighten the color of the teeth as much as necessary. There is no one way to whiten teeth in photoshop but this is one route.
Zoom into the mouth of your subject and paint on a new layer. Reduce the brush size so that it just covers the teeth. Adjust the brush opacity until your teeth are white, using “Undo” if necessary. Click to paint over all the teeth in your subject’s mouth. Select “Inverse” from the “Select” menu when you are done painting over all the teeth. Click to paint over the teeth–this process selects them. It should now look like your subject is smiling with white teeth. Whitening teeth in photoshop is easy and only requires a few steps.
Open the photo you want to edit in Photoshop. Select the Zoom tool, and click once in the image window to zoom in up to 1600%. Click the Brush tool, or press the B key. Click the foreground color swatch in the toolbox, or press D, to set the foreground color to black. Right-click (Windows) or Control-click (Macintosh) on the image. Use a large, soft-edged brush to paint over discolored teeth. Repeat this process if necessary, using smaller brushes and lower opacity settings as needed. This is all you need to know about whitening teeth in Photoshop.
Open your photo in photoshop, and make a new layer. Select the brush tool and adjust its size to the size of your subject’s teeth in pixels. set the brush mode to color and the opacity to 50%. Paint over the teeth. Rinse, lather, and repeat until teeth look like you want them to look. Your subject’s teeth will probably look best if they are not blinding white so use the technique sparingly.
Open photoshop, duplicate the background layer, and rename it to “teeth,” then click on that layer to make it active. Create a new layer mask by pressing the new layer mask icon at the bottom of the layers palette. Select the brush tool, use a soft round brush with 100% opacity and 0% hardness, and set the brush size to match the teeth. Click on the black and white rectangle icon at the bottom of the Layers palette to select foreground and background color (black or white – depending on which way you want to paint) and paint over teeth. Teeth can be retouched in Photoshop in a few easy steps.
Open the photo you want to edit in Photoshop. Select the Lasso tool. Using the Lasso, trace around the teeth and select them. Use Levels (or Curves) to whiten your teeth. Use a mid-tone gray. Learning Photoshop can be hard at first, but it is a very useful tool for editing photos.
Now you can whiten teeth in photoshop, pretty simple to do and works really well. Ok, let’s begin!


