In this blog post, we will discuss how to make an artboard transparent in Illustrator. This is an important step for many reasons. One reason is that it can save you a lot of time and frustration when you are working on a project. Another reason is that it can help improve the quality of your work. We will go over the detailed steps on how to do this, and also talk about why it matters. Finally, we will give you some tips on how to save a transparent artboard.
Making An Artboard Transparent: Necessary Steps:
Making an artboard transparent is a pretty simple process. You need to make sure that you have the correct settings enabled.
First, open up your Illustrator document. Then, go to the “File” menu and click on “Document Settings.” A new window will pop up. In the “General” tab, look for the “Transparency” section. Make sure that the “Blend Mode” is set to “Multiply.” Then, click on the “OK” button to save your changes.

You may like to read about 5 Tips for Making Marketing Animated Video Ads.
Now that you have your document set up correctly, you can start working on making your artboard transparent. The first thing you need to do is select the object that you want to make transparent. To do this, simply click on it with your mouse. Once you have the object selected, go to the “Object” menu and click on “Transparency.” A new window will pop up. In the “Transparency” window, change the “Blend Mode” to “Multiply.” Then, adjust the “Opacity” until you are happy with how transparent the object is. When you are finished, click on the “OK” button to save your changes.
That’s all there is to it! Making an artboard transparent in Illustrator is a pretty simple process. However, it can be a bit time-consuming if you have a lot of objects in your document. Luckily, there are a few ways to speed up the process.
One way is to use the “Select All” command. To do this, simply go to the “Edit” menu and click on “Select All.” This will select all of the objects in your document. Then, you can follow the steps above to make them all transparent.
Another way to speed up the process is to use the “Magic Wand” tool. To do this, simply click on the “Magic Wand” tool in the toolbar. Then, click on the object that you want to make transparent. All of the objects that are touched will be selected. You can then follow the steps above to make them all transparent.
Also, read What Makes a Good UX Designer? on our website.
Why It Matters to Make An Artboard Transparent?
Making an artboard transparent can be a useful technique for many different projects. It can save you time and frustration, and it can also help improve the quality of your work. It has the following advantages for a graphic designer:
- When you are working on a project, it can be helpful to see how the different objects in your document interact with each other. By making an artboard transparent, you can easily see how the different objects in your document interact with each other.
- It can also help you to identify any areas that need improvement. By seeing how the different objects in your document interact with each other, you can easily identify any areas that need improvement.
- Finally, it can help you to save a lot of time and frustration. By making an artboard transparent, you can avoid having to go through the process of individually selecting each object in your document.
Do you know the difference between UI and UX Developers? If not, read the blog post “UI UX Developer vs. Graphic Designer: Who Does What?“
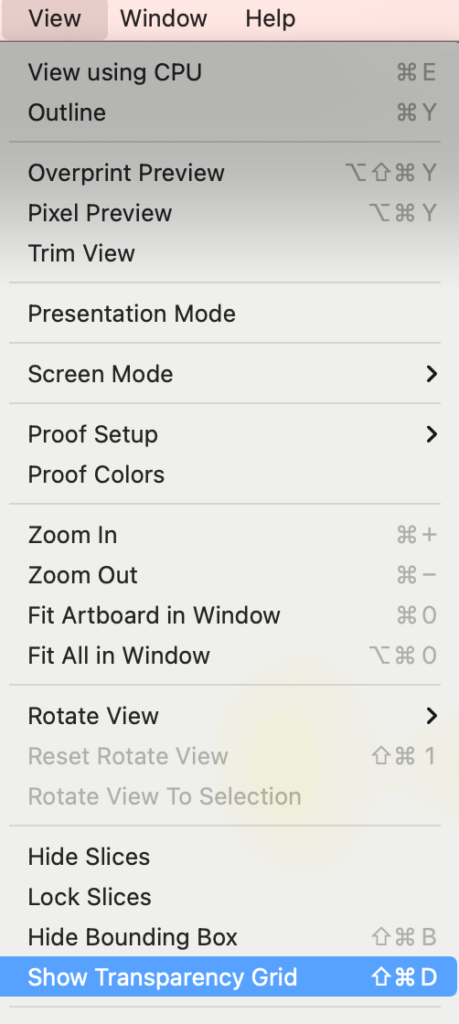
How to Show Transparent Grid in Illustrator?
If you want to see the transparency grid in your document, simply go to the “View” menu and click on “Show Transparency Grid.” This will show the transparency grid in your document. You can then use it to help you identify any areas that need improvement. The shortcut key for showing the transparency grid is Cmd/Ctrl+Shift+D.
Saving a Transparent Artboard: Important Tips
When you are finished making your artboard transparent, you will need to save it as a PNG file. To do this, simply go to the “File” menu and click on “Save As.” In the “Save As” dialog box, select the “PNG” option from the “Format” drop-down menu. Then, click on the “Save” button to save your file.
There are a few things to keep in mind when saving a transparent artboard:
- Make sure that you select the “PNG” option from the “Format” drop-down menu.
- Make sure that you click on the “Save” button to save your file.
- If you are using a Mac, you may need to hold down the Option key when you click on the “Save” button. This will ensure that your transparent artboard is saved correctly.
Is UX Design For Me? The Truth Revealed, if you have the same question in mind, must read it.
How to Use a Transparent Background to Save Artwork?
There are a few different ways to use a transparent background to save the artwork. One way is to use the “Clipping Mask” command. To do this, go to the “Object” menu and click on “Clipping Mask.” Then, select the “Make” option from the drop-down menu. This will create a clipping mask around your artwork.
Another way to use a transparent background is to use the ” opacity” setting. To do this, go to the “Object” menu and click on “Opacity.” Then, select the ” Make Mask” option from the drop-down menu. This will create an opacity mask around your artwork.
Finally, you can also use the ” transparency” setting. To do this, go to the “Object” menu and click on “Transparency.” Then, select the ” Make Mask” option from the drop-down menu. This will create a transparency mask around your artwork.
By using one of these techniques, you can easily save your artwork with a transparent background.
That’s all there is to it! Making an artboard transparent in Illustrator is a simple process that can be very useful for many different projects. By following the steps above, you can easily make an artboard transparent in Illustrator.


